How to Ace your March Madness Bracket
Hi, Tamra here!
I believe that anybody can experience anything and deserves the right to. For this to happen in the world that we live in today, it is also important to believe that anything is adaptable. (No worries, I believe that too.)
I believe that if the world was 100% accessible for all types of people, then there would be no “disabilitiesâ€.
I believe that until the world reaches this level of accessibility, it is our job as supporters of people that experience disabilities to modify these more limited things, to make them inclusive, and break down any barriers that exclude our people from participating in them.
This “adaptation for  all†thinking can be applied to almost anything; Ways for people to communicate, methods to help a person learn, even super fun activities, like making predictions in March Madness Tournament Brackets, (one of many BOL adapted activities!)
ESPN estimated that about 40 million people fill out brackets during March Madness each year. This go round, we were included in that number. Here’s how we adapt this popular activity.
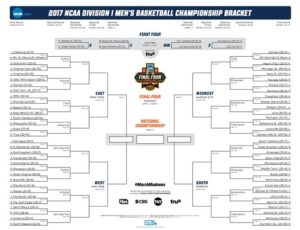
- 1. First, we visited the CBS sports website to get a list of all 68 teams that made it to the tournament. These teams are usually released about 3 days before the first game of the tournament on a blank bracket. Below is the official 2017 blank NCAA bracket.
- We then google-searched the teams playing to find an image for each one. These images were copied onto a Microsoft Word document, stretched so they covered at least a ½ sheet of computer paper, and printed.

- When all photos were printed, we separated each team into regions: North, South, East, and West. (Region classifications can be found on the blank bracket above) We then strategically taped each team to the wall under their region. Teams playing each other were placed side-by-side.

- Each person visited the North, South, East, and West wall to form their 2017 bracket picks. While our people pointed, starred at, or said the names of the teams they thought would win each game, staff wrote those predictions down, collectively creating a bracket for each person at Branches.
Check out the video we made during the selection process!
https://www.instagram.com/p/BRqkxNxlUzH/?taken-by=branchesva
Why visual supports to make choices?
Providing a person with a visual support almost automatically increases receptive communication for all learners, because you are providing people with more information. Visual supports instantly paint a better picture of what you are asking a person to choose from. If I say : “Which do you think will win, University of Florida, Or Virginia Tech†this could be a be a hard decision if I know nothing about either school. If I ask that question again using these visuals:

I can then pick Florida, based on my love for alligators, or pick Virginia Tech based on solely on my hate for the blue & orange color combination. Seeing the VT symbol may remind me of my dad’s keychain, where he went to school, and influence my decision. The goal is always to help our people make informed choices.
Visuals also increase opportunities for expressive communication. Instead of being forced to use words to answer a question, pictures allow other was to choose, like eye gaze and pointing. Visual supports help our people to make more clear choices.
Remember, we don’t adapt things because of the “disability†that a person may have, (that’s never the problem) rather, when adapting, fix your eyes on the barrier that makes something less accessible. Is it in the design of a system? Does something move too fast? Is it not big enough? Once that disconnect is is identified, address it, modify what you can, and voila, you’ve adapted it, creating an inclusive activity that all can enjoy. Keep these tips in mind, and help us create a more accessible world, one modification at a time.
Thanks for reading– oh, and congratulations, Sarah, for winning the BOL bracket this year!